Wednesday, 30 November 2011

Earl Grey Cupcakes

I've never been to Primrose Bakery, but oh my gosh, I really want to! I've been dying to try out this recipe for a while now. Earl Grey is my favourite variety of tea, so this recipe was too good to resist.


Earl Grey Cupcakes
(from Primrose Bakery)

Ingredients
125ml milk
4 Earl Grey tea bags (or you could sub with your favourite variety)
110g unsalted butter
225g granulated sugar
2 large eggs
1/4 tsp almond essence (optional)
125g self-raising flour
120g flour

Frosting:
115g unsalted butter
60ml semi skimmed milk
1tsp good quality vanilla extract
500g icing sugar
few drops of lilac food colouring

Method:
Preheat oven to 180C/gas mark 4. Line a 12 hole muffin tray with cupcake cases.
Heat milk in a saucepan over a medium heat until it begins to boil. Remove from the heat and add teabags. Cover with a lid for about 30 minutes.
Cream butter with sugar in a bowl until the mixture is pale and smooth. After this has been achieved, add almond extract and eggs one at a time, mixing after each addition. Scrape bowl with a spatula to make sure that the mixture is well combined.
Combine the flours in a separate bowl. Add a third of the flour to the butter and sugar mixture and beat well. Pour in a third of the milk/tea mixture and beat. Repeat until all the flour and milk has been added.
Carefully spoon mixture into cupcake cases, filling each one two-thirds full. Bake in the oven for about 25 minutes. 
After cooked, leave in 10 minutes, then place on a wire rack to cool.
To make butter cream, beat butter, milk, vanilla and half the icing sugar until smooth. Gradually add the rest of icing sugar to produce a creamy and smooth consistency. Add a drop of colouring and beat thoroughly.


There's nothing I love more than a cup of tea, whether it be a standard builder's brew, or something really weird (I'm desperate to try pomegranate tea!). But at the moment, I'm totally hooked on Earl Grey tea. 
So I'm going to sit here and eat these cupcakes while drinking the namesake tea. Yum!!

On another note, I recently found a baking blog that I'm absolutely obsessed with. It's called katiecakes, so you should go and check it out, because personally I think she's amazing!
Also, theres a new blog name. Orla came up with it, so go check out her Twitter!
And while you're there, check out my Twitter!

Happy December to you all, I've got some festive bakes up my sleeve!

Monday, 21 November 2011

New York Cheesecake

I haven't blogged in a while, sorrrrry! But I'm back now with a very delicious cheesecake, and some more planned bakes for the near future.

Ingredients

600g soft cheese
284ml pot double cream
100g icing sugar
vanilla essence
250g digestive biscuits
100g butter, melted

N.B Alternatively, I like to use Chocolate HobNob biscuits, depending on the flavour of the cheesecake. It makes it slightly oatier, with a little bit of milk chocolate. YUM.

Method

1. Butter and line a 23cm loose-bottomed tin with baking parchment. To make the base, put the biscuits in a plastic food bag and crush to crumbs using a rolling pin. Transfer the crumbs to a bowl, then pour over the melted butter. Mix thoroughly until the crumbs are completely coated. Tip them into the prepared rin and press firmly down into the base. Chill in the fridge for ideally an hour to set firmly.

2. To make the filling, place the soft cheese, icing sugar and vanilla into a bowl, then beat with an electric mixer until smooth. Tip in the double cream and continue beating until the mixture is completely combined. 

3. Now spoon the cream mixture onto the biscuit base, working from the edges inwards and making sure that there are no air bubbles. Smooth the top of the cheesecake down.

4. Leave to set in the fridge for as long as possible (overnight would be best).


As I didn't make this at home (I made it at school), I couldn't take pictures of my method etc, but the recipe is incredibly simple and is practically foolproof!

Tuesday, 25 October 2011

Coffee and Walnut Cake

I adapted the classic Nigella Lawson 'Coffee and Walnut Layer Cake' recipe to suit me and my family, so I will write out the ingredients I used and my method.

Ingredients
FOR THE SPONGE:
50g walnut pieces
225g caster sugar
225g soft unsalted butter, plus some for greasing
200g plain flour
 2 1/2 teaspoons baking powder
1/2 teaspoon bicarbonate of soda
4 eggs
1-2 x 15ml tablespoons milk
1 espresso shot

I used our coffee machine to achieve this. Alternatively, if you wanted a more muted coffee flavour, you could just use 2 teaspoons instant coffee granules dissolved into a tablespoon of water.

FOR THE BUTTERCREAM FROSTING:
I actually just used the buttercream I had left over from my rainbow cake, but added a shot of espresso to give it the coffee flavour.

The ingredients of my buttercream frosting were:
350g icing sugar
175g  soft unsalted butter
1 tbsp milk
(add the 1 espresso shot here)


Method
It is possible to make this recipe using a food processor, but I prefer making it by hand.

Butter the 2 sandwich tins and line the base of each with baking parchment.
Bash the walnuts to a rubbly powder with a rolling pin and then mix with all the dry ingredients in a mixing bowl.
In a separate bowl, cream the butter and the sugar together until considerably lighter. Then add the eggs, one at a time, and then the dry ingredients, bit by bit. At this stage, add the coffee, which shouldn't be too hot as coffee that is too hot will melt the fat in the butter.
Divide the mixture between the two lined tins and bake in the oven for 25 minutes, or until the sponge has risen and feels springy to the touch.
While the cake is in the oven, you can make the buttercream.
Cool the cakes in their tins on a wire rack for about 1- minutes, before turning them out onto the rack and peel off the baking parchment.


Instead of using instant espresso powder, like it says in the original recipe, I made a shot of espresso from our Nespresso machine (which is pretty damn cool, by the way.)


I had never even tasted a coffee and walnut cake before, let alone made one, so I had no idea what it was meant to taste like. BUT IT TASTED GOOD, and I think that has to be a good sign, right?

Sunday, 23 October 2011

American Brownies!

Everyone has their own brownie recipe, but I use Delia's (because Delia Smith is amazing. No argument...)

Ingredients
110g butter
50g American unsweetened chocolate or plain dessert chocolate
2 eggs, beaten
225g granulated sugar
50g plain flour
1 tsp baking power
1/4 tsp salt
110g chopped nuts - these can be walnuts, almonds, hazelnuts or Brazils or a mixture (today I used walnuts, almonds and some pecans I had lying around)

Method
Pre-heat the oven to 180C/160C fan

Grease and line a baking tin measuring 18 x 28cm (or use a silicone brownie tray that doesn't need greasing).

First of all melt the butter and the chocolate (broken up into small pieces) together in a basin fitted over simmering water on a low heat). Away from the heat, stir al the other ingredients into the butter and chocolate mixture thoroughly, then spread all this in the lined tin.

Bake in the oven for 30 minutes, until the mixture shows signs of shrinking away from the side of the tin, and the centre feels springy. A skewer inserted in the centre should come out cleanly (but don't overcook - it will firm up as it cools). Then leave the mixture in the tin to cool for 10 minutes before dividing into approximately fifteen squares and transferring them to a wire rack to finish cooling.


 By using a silicone brownie mould, I didn't need to grease or line a tin, which is time consuming and it makes it easier to get the brownie out after baking.


After 10 minutes of cooling, I cut the brownie into rectangles, sprinkled them with icing sugar and swamped them in raspberries (because raspberries are the best berries, fact.)


I'm going to freeze one of my brownie pieces until around two weeks time, when I shall be doing another brownie bake, but next time I am going to try another recipe, by Mary Berry. Can I just get this straight? I ADORE MARY BERRY. She was amazing on The Great British Bake-Off, and want to bake absolutely everything by her.
When I've done the Mary Berry brownie bake, I will compare the two recipes and the brownies and tell you all my ultimate brownie recipe, I'm very excited!!


Saturday, 22 October 2011

Birthday Shenanigans!

so today is my birthday and I finally reach the age of fifteen. That's really scary, that means I'm halfway to 30, which feels absolutely ancient!
That also meant that I got to change my blog biography from 'an awkward fourteen year old cooking student' to the ever so different 'an awkward fifteen year old cooking student'.

During my special day, I went to my drama school (of course), went for a special birthday lunch to Nando's, our favourite restaurant, and then headed to Westfield for some shopping for some flat whites with the infamous Cousin Candice (although both Ella and Bebe drunk hot chocolate, and I was the only flat white drinker of the table, silly girls).
After making such a giant birthday rainbow cake, I took some for the girls in Nando's. I think they were surprised that I had any baking skill whatsoever. And the whole restaurant sung me 'Happy Birthday'!


Present-wise, I got brand new iTouch, which is going to get a lot of use, as well as perfume, money etc.
Baking wise, I got two lovely books.
Firstly, from Bebe, I got an amazing cupcake book called 'What's New, Cupcake?' by Karen Tack & Alan Richardson.


They have the most spectacular recipes and creations in this book, I can't wait to try a few out, even though they are all really challenging. I know my mum, being the biggest fan of my cakes (just kidding, she wishes I would stop), will be thrilled at my new gift.


Even Chinese takeaway noodles and fried rice cupcakes were in this book (of course it's not real noodles, it's made out of icing and sweets. yum.)


Secondly, THE GREAT BRITISH BAKE OFF COOK BOOK!!
My mum and I were fans of the show from the very beginning of this series, we were hooked. So when it finally came to the end, I asked for the cookbook, so I could relive all of the classic memories (I'm a freak, so what?)


All in all, it was a great day, spent with great people doing great things!
Thank you to everyone who wished me a great day on Facebook or Twitter, you guys are all great!

Until next year! xxxx

Friday, 21 October 2011

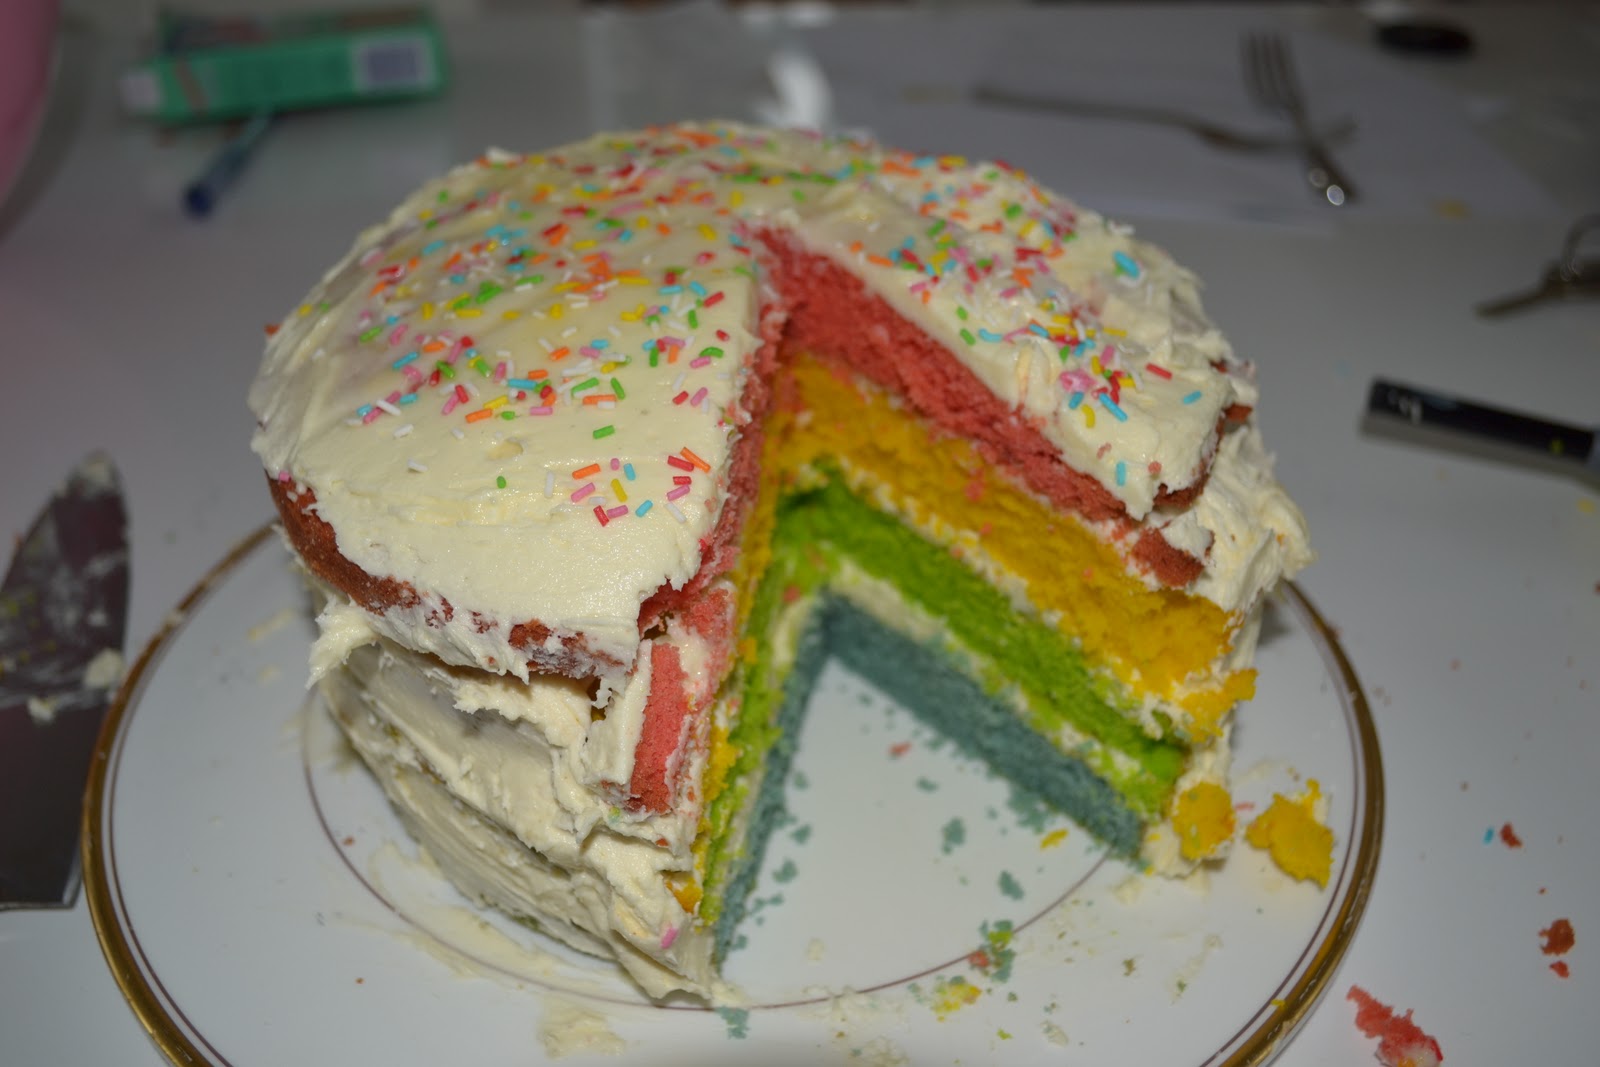
Rainbow Cake!

Because it is my birthday tomorrow, and I'm turning 15 (yes, that's right. 15. uberly-dooberly excited!!) I made myself a birthday cake.
That sounds really lame. Nobody should bake their own birthday cake. However, no one was willing to make a cake for me, so my friend Marlin and I made a rainbow cake, consisting of four layers of sponge: red, yellow, green and blue. We then covered it in vanilla buttercream icing.

Yum.

(I apologise in advance for any hideous pictures of me. Fair to say I wasn't looking my best)

Ingredients


FOR THE SPONGE
400g unsalted butter, plus extra for greasing
400g caster sugar
2tsp vanilla extract
8 medium eggs
400g self-raising flour
food colouring

FOR THE ICING
420g butter
840g icing sugar
4-5tbsp milk
1tsp vanilla extract

I couldn't find a definite recipe for rainbow cake so I kind of had to make one up.

CAKE RECIPE
Heat oven to 190C/170C fan/gas 5. Grease and butter the sandwich tins. Place the butter, sugar and vanilla extract into a bowl and beat well to a creamy consistency. Slowly beat in the eggs, one by one, then fold in the flour and mix well.
Divide the cake mixture equally into bowls and add enough food colouring to create the colour desired. Then, transfer the coloured mixture into the cake tins, place in the oven and bake for about 20 minutes until risen. Check that they are cooked, and then turn out onto a wire rack and cool completely

FOR THE ICING
Beat the butter in a large bowl until soft. Add half of the icing sugar and beat until smooth.
Add the remaining icing sugar and two tablespoons on the milk and beat until the mixture is creamy and smooth. Beat in some milk, if necessary, to loosen the mixture.


You will need 4 sandwich tins to create four layers, but as I only had two, I did the ingredients for the sponge in two batches.


Marlin, my co-baker for the day, and I have always wanted to make a rainbow cake. We'd seen so many pictures on Tumblr, and it was time to make our own.


We wanted bright, bright colours, and only achieved this through lots (and lots) of food dye.


When the mixture was as colourful as we wanted it to be, we transferred it to the tin, and made lots of mess.


After 20 minutes in the oven, the first batch (blue and green) were done, but went a little brown, so we decided to try the next batch at 15 minutes. 
When we took the second batch out of the oven, they seemed fine and cooked. But when we left them to cool for 5 minutes, everything went wrong...


The entire structure collapsed, as part of the cake wasn't cooked (though when we tested several parts of the cake with a skewer it seemed fine) and made a total mess. It looked unrepairable, until we somehow managed to stick it back in its tin (with lots of effort and moments of fear) and put it back in the oven.
It didn't look its best, but that didn't matter, as the whole cake would be covered in buttercream icing.


When all the cakes were finally baked, and they were layered in order of the rainbow, we made the icing.


WE WERE DONE!! The cake doesn't look its best on the outside, but we covered it in sprinkles, stuck some candles in and everyone sang Happy Birthday to me while I stood there awkwardly, not really knowing what to do with myself.


When the cake finally got cut, and we saw the inside of our creation, Marlin and I cried. We actually cried.
What are our lives coming to?


It looked amazing. I'm so happy with the result. The colours were so bright and the sprinkles were also really bright colours.

HAPPY BIRTHDAY TO ME
HAPPY BIRTHDAY TO MEEEE
HAPPY BIRTHDAY TO LUCY
HAPPY BIRTHDAY TO MEEE


Sunday, 16 October 2011

pre-spain paella!

Because my family and I are going to Barcelona tomorrow, we decided to make a cheeky paella to get ourselves in the mood.

You can find the recipe we used here.

After my sister attempting to cook the chorizo (and then burn it and walk off in a mood), I took over the cooking...
Can't say I was any more successful, but no one has got food poisoning (as of yet, fingers crossed) and no one complained too heavily, which is always a good sign.

This probably isn't the traditional paella recipe, but it worked for us and was very quick and easy to make, and included two of my favourite things: chorizo and chicken (duh.)


THE FINAL PRODUCT!!

oh yess, i was quite happy.

Anyway, I'm off to Espana tomorrow, and maybe I'll make a cheeky blog post about that, we'll see how things go...